Site Tools
User Tools
Table of Contents
Spatial Data management
The data management is made through the Data menu, it contains the following elements:
- Link data… (Ctrl+O): reference a support layer which will be displayed in your project
- Unlink data… (Ctrl+W): unlink a layer
- Import data: import data into one of your construction theme
Link data
The Link Data… option from the menu Data allows loading some support themes for the vectorization of the construction layers. Those support themes can be vector data (*.shp) or raster data (*.tif, *.JPG and Esri's binary GRID).
In the opposite of the construction layers, the support themes are not stocked in the project but only referenced.
Rotation
Some of your files may have rotation information, which is not yet supported by ToolMap. In that case you will see the following message:
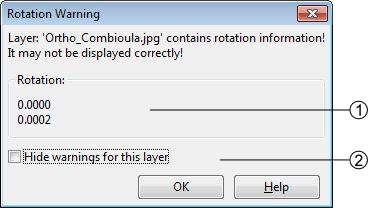
- rotation information
- display option
This message will pop up every time you make an action regarding the layer (including trivial actions like zoom or pan), so be sure to convert your images into non-rotated rasters. If the rotation is insignificant, you may prefer to simply ignore the message by checking the option Hide warnings for this layer. This option prevent the appearance of the message for the current session, but it will pop again the next time you launch your project.
Import data
The Import data… option from the menu Data allows you to import some existing information into your construction layers. You can only import lines or points geometries. The process is made in 3 different steps.
Step1
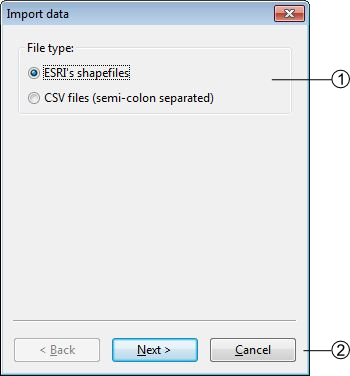
- the Import data… option allows two types of data, choose the one you want to import
- Go to the next step of the import or cancel the operation
Step2
If you choose to add a shapefile the following step comes ahead
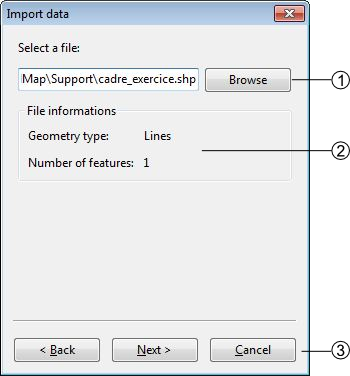
- Directory path of the shapefile
- data information of the shapefile
If you choose to add a CSV file the following step comes ahead
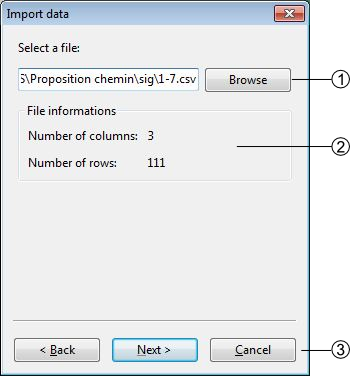
- Directory path of the CSV file
- Information on the CSV file
- allow to go back or to continue to step 2.2
Step2.2
The CSV files are composed of columns of data separated with commas, you will have to choose wich column you want to assign to the X and Y coordinates

- List of the columns which can be assigned as X or Y coordinates
- allows to go back or to continue to step 3
Step3

- List of layers within the data will be imported (with the shapefile import the choice is restricted to the geometrical type of the data)
- import the data or cancel the operation
Table of contents options
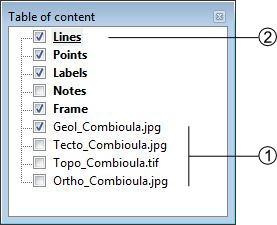
 : Activate the display of the layer
 : Deactivate the display of the layer
- Edition mode activated: the layer is underlined
contextual menu
The contextual menus are opened by right-clicking on a layer of the table of contents. They vary according to the selected layer.


- Name of the layer
- Edit this layer(construction layers only)
Remove layer(support themes only)
- Move the selected layer in the table of contents
- Display management of the vertex (line and polygon layers type only)
- Symbology management. This option can also be activated by double-clicking on the layer. (see chap. Symbology)